Is ZW3D able to import photograph in any format (jpeg,png,bmp, tiff etc.), display it as a background image (control transparency and the size “on fly”) and then open sketch and trace the shape of the part from the image? ( I know Space Claim has that).
This is usable for reverse engineering from pictures and photos.
Trying the “Import Image” command converts it into raster or something like that, where the precise shape is lost.
Thank you
Yes, it can and you can control transparency.
Form a filter perspective, the Image is a Symbol so turn off the Symbol selection so you do no keep picking the image.
Cheers - Paul
Thank you, Cowboy 99, but I do not think I understand your reply.
I have done search in Help manual for Symbol and most everything there is in Drawing Sheet Environment.
Search for “Import Symbol” there is No Topic Found!
My question was, if there is any way to import and display photo in jpeg or bmp format (that is, without converting it to raster image or similar). That means open Photo in the Geometry creation environment, specifically in Sketch. Maybe to put it on a different layer and draw sketch over it.
Something, like Space Claim does: https://www.youtube.com/watch?v=afrCy4jqtws
or:https://www.youtube.com/watch?v=7ddKKybirFI
or: https://www.youtube.com/watch?v=vxnfrhwLe2o&t=218s
Here is attached my drawing, which I would like to import-only for exercise!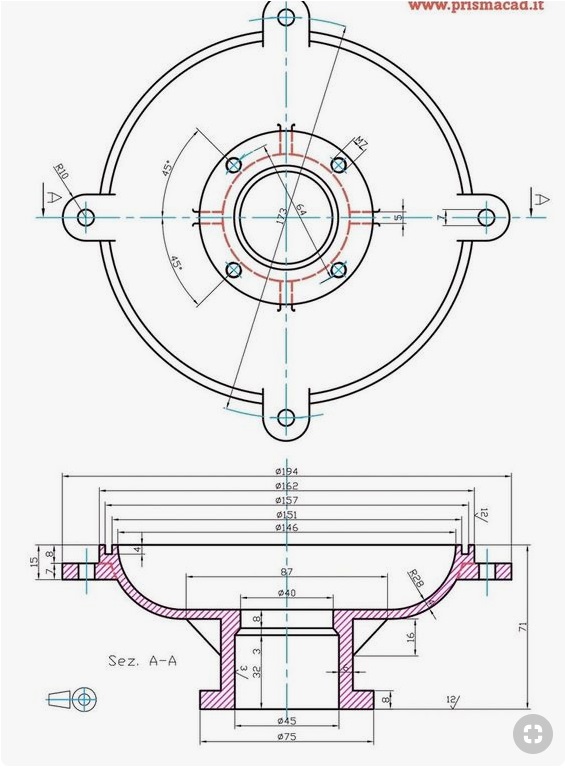
Thank you
Resu 123
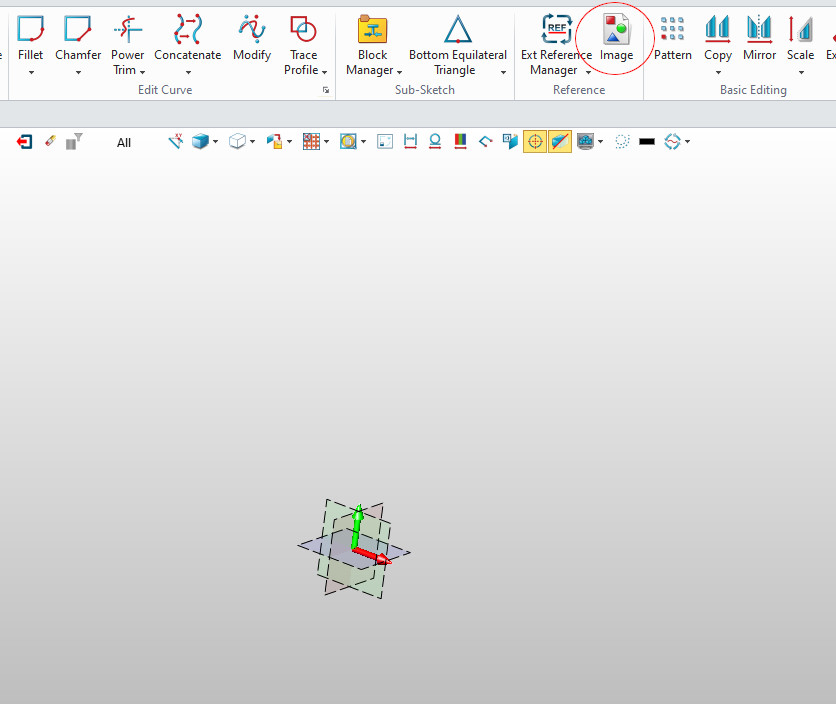
Select a Sketch Plane and enter Sketch mode
From the Menu Ribbon select Image…
I find manipulating / resizing not intuitive, however once you have your scale correct, use Right click and move for positioning.
Cheers
W
Thank you Mr. Jones.
I worked. Though as you hinted it is not very intuitive process. At the beginning of this post, Cowboy 99 has said, that I should use the Symbol on/off function in filters…that did not work. Did not do anything. Seems like the software doesn’t see the image as a symbol.
What I had to do, is import the image into open sketch 1 and then exit the sketch and keep it(not erase it) when it asks you to do so, because the image doesn’t have any geometry.
Then create new sketch 2, and there I trace the section of the part I am working on. Then shut the Sketch 1 off, so I can see only the Sketch2 with geometry and exit this Sketch2 and perform solid creating function as rotate, extrude etc…
Then turn the Sketch 1 with image on again and create new Sketch3,4, and so on and create another corresponding section of the part.
Some sketches created in TOP plane of the image need to be rotated 90 degrees around X axis and then moved in position, or, the Corresponding Sketch can be rotated by Relocate function in Sketch environment(al the way up on right side) and then moved into position. Though the relocate function seem to not leave any track of its execution in the history. To move the sketch into position I have included the circle from the “TOP” view of the part and then use it to align the concentricity with the revolved body of the part…and then erased big circle from the sketch as it was not the art of the extrusion command…
The Sketches are all unconstrained, so they can be later adjusted to fit the picture/photo or made to some nominal size.
At the end, the part can be either scaled or dimensions in the sketches adjusted,
using the surface functions direct editing to bring the part closest to the drawing sizes…
The dimensions in this particular case do not mean anything and were not used. It was assumed, that the part photo came without the dimensions and maybe you only have few of them, by measuring the piece you photographed, so the part can be scaled to correct size…
It is obvious, that if you have the dimensions(as on this part) it would be easier and more precise, if you construct the geometry, by sketching everything and then use the correct functions as Rotate, Extrude etc…
This part was used only as a example for exercise!
I am attaching the part with it’s history, if someone is interested.
Part from photo.Z3 (299.8 KB)
On the Sketch with the Image, add sketch geometry that is full size, then scale and move the image to fit.
Now that this sketch has geometry there will be no warning (to keep) when closing the Sketch.
Also, when Images are on separate Sketches than your main modelling sketches, Z3 is faster if they are turned off when not required.
Cheers
W
Yes, Sir, indeed…